A detailed check of the rig and every component that holds it up is a sensible precaution that’s worth carrying out at least once a season, or before sailing any unfamiliar boat. A visual check won’t reveal everything as hairline cracks invisible to the naked eye can cause stainless steel to fail, but it’s a good place to start.

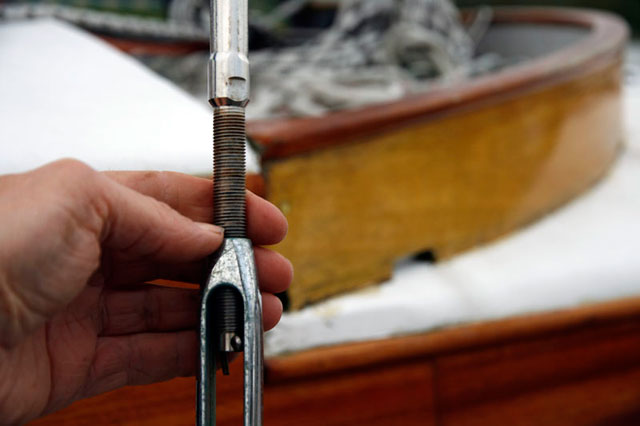
Counting the number of exposed threads means that you can set the rig up exactly as before, even if someone else lowers and re-steps it
Stainless steel rigging wire rarely breaks in the middle of a run – it’s the ends that need careful attention, including the swages that join the wire to its terminals, spreader roots, and rigging terminals. If strands of a wire start to break, this will normally be where it emerges from the swage.
Spreaders should be checked to ensure the outer ends are smooth and that the roots are securely attached to the mast, with no movement. While up the rig it’s worth checking for chafe or other problems on the halyard or furling genoas and the boom topping lift. It’s also a good opportunity to check that the halyard sheaves run smoothly and to lubricate them with silicon spray if necessary.
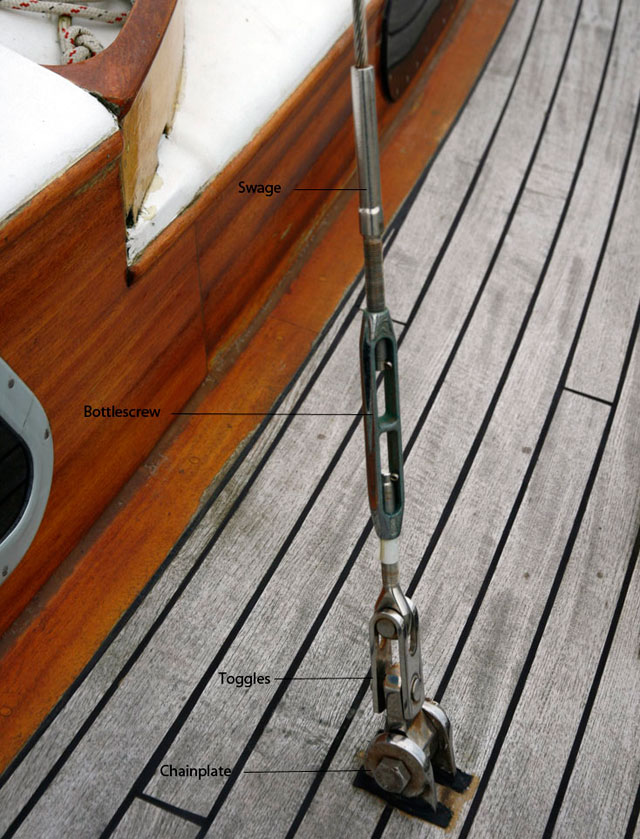
Rigging terminals should be designed to articulate so that all the components – toggles, bottlescrews, swage terminals and the wire itself – line up perfectly, thus transferring the considerable loads smoothly through the system. A wire that bends as it leaves the swage is a sure sign that something is amiss in this respect.

Here we can see the key components of the rig - chainplate, toggle, bottlescrew, swage, wire
Spreaders should be angled such that the load imposed by the shroud is exaclty along the line of the spreader. In practice this means in most cases they should be angled slightly upwards, especially with single-spreader rigs. Anything else, particularly droopy spreaders, means the load from the shroud will tend to tear the spreader root away from the mast.
Routine rig checks
Much of boat maintenance is a continuous process of keeping an eye open for problems and this applies as much to the rig as any other part of the boat. In particular a single windy day can put as much strain on the boat, fittings and sails as half a season of sailing in moderate conditions, so it’s worth checking the boat over doubly carefully before setting out.
While it’s not practical for most crews to climb the rig on every such occasion, it’s surprising the level of detail at the masthead that can be seen through binoculars. Equally, on a long passage it’s worth checking the rig in this manner a couple of hours before nightfall, so that any pending problems can be dealt with in daylight.
How tight should the rigging be?
A correctly tuned rig is not something that only hot-shot racing crews need to be concerned with – correct adjustment is essential for the structural strength of the rig and its longevity. However, it also has the benefit that the boat’s handling will improve – it will be easier to steer, with a better balanced helm, and faster, especially to windward.
The most common problems found on cruising yachts relate to rigging that is too slack, particularly the shrouds. A frequent misunderstanding between owners and boatyards is that on re-stepping the rig few yards will tune it unless specifically asked to do so. This means a huge number of cruising boats sail to windward with the lee shrouds slack, which creates a number of problems.
Firstly, the movement of the rigging can cause fatigue, which stainless steel is particularly prone to, thus increasing the possibility of failure of a key component. In addition, rigs with swept-back spreaders rely on a degree of tension in the lee shrouds to help keep the rig in column.
How much tension is enough? With the boat fully powered up going to windward in a moderate breeze the lee shrouds should retain a small amount of tension. If the rig was well tuned before the rig was lowered, then counting the number of turns of the bottle screws will enable it to be returned to the same settings.
It’s easy to count exposed threads, both above and below the bottlescrew, so once you have achieved a good setting it’s worth recording it in the boat’s logbook. These settings can then be repeated for that set of rigging, which is especially useful for boats that are laid up for winter at boatyards where the rig must be lowered.

When sailing close hauled with the rig fully powered up there should still be a little tension in the lee shrouds.
Other rigging problems
There are a few other reasons that many cruising boats sail around with slack rigging. Most insurers have traditionally insisted that standing rigging is replaced every 10 years (and often more frequently for racing boats). Even if the new rigging is tuned perfectly, it’s liable to stretch a little and will therefore need tweaking after the first few hundred miles of sailing.

A badly compressed mast plinth, with the centre of the metal maststep having sagged more than 5mm
Compression of the mast step is a potential problem on older boats with deck-stepped rigs. This generally happens as a gradual process, with the mast heel moving downwards and the rig therefore losing tension. The most common problem in this respect is with the moulded mast plinth, which usually has a wooden core. If leaking deck fittings or wiring glands allow the timber to get wet it will decay, loosing structural strength and becoming squashed. The classic sign of this is a dished appearance to the top of the mast plinth.
The solution is to remove the top skin of fibreglass, replace the damaged timber with a block of hardwood and then make good the outer layer of fibreglass, including colour-matched gelcoat. Of course, it’s much easier to just make sure you don’t have any leaky fittings near the mast step.
Boats with deck stepped rigs occasionally also develop problems due to compression of the coachroof, although this is generally found on only smaller older boats, as most others have a compression post that’s effective in transferring the rig loads downwards to the keel.

Sem comentários:
Enviar um comentário